Cabinet Painting Sacramento is a complicated project that requires careful attention to detail. It can take a lot of time and requires an experienced contractor to get the job done right.
Set up a work area in your garage or a well-ventilated space to paint the cabinets, doors, and drawer fronts. Clean all surfaces thoroughly with a degreaser to remove kitchen grime and grease that will prevent the new paint from adhering.
Painting your cabinets is a great way to update your kitchen and add a new color. However, a quality paint job requires proper preparation. It’s important to clean and sand the cabinets before you start painting. This will ensure that the new paint will adhere to the surface and look professional. Using a degreaser or trisodium phosphate (TSP) is an effective way to remove dirt and grease from the cabinet surfaces. You can find this product in most hardware stores or online. Be sure to wear gloves and protective eyewear when working with TSP, as it can be harmful if not handled properly.
Once your cabinets are cleaned, you’ll want to sand the surfaces to remove any existing finish and smooth them. Start with a coarse grit, such as 100-120, and then move on to finer grits (220-320). Be sure to sand in the direction of the grain.
It is also a good idea to use a putty knife and wood filler to fill any cracks or nicks in the cabinet surfaces. Once the wood filler is dry, sand it again until it’s flush with the rest of the surface.
Next, you’ll want to wipe down the cabinet surfaces with a damp cloth to remove any dust or debris that is left on the surface. This is especially important if you’re going to be using a darker paint, as it will show any flaws in the surface.
Once the surfaces are dry, you can begin priming. It’s best to start with the inside of the cabinets, then move on to the doors and finally the trim. This will prevent any mistakes from showing up on the fronts of the cabinets.
Be sure to use a high-quality primer that’s designed for use on cabinets. It will help the new paint adhere to the surface and last longer. Also, be sure to use a brush or roller with an angled edge for any areas that are difficult to reach. Once the primer is dry, you can begin painting your cabinets.
Priming
There are many different paints, primers and topcoats that can be used for cabinets. It is important to choose a quality product that will provide superior coverage, smooth application, and durability. Cabinet primers and topcoats also need to be designed with specific environmental and performance requirements in mind. This includes resistance to moisture, grease, and high heat. In addition, they should be free of volatile organic compounds (VOCs) and other hazardous chemicals.
Professional kitchen cabinet painters use the best quality products available to ensure their work meets high standards and provides long-lasting results. They may also use specialized equipment like airless sprayers or hand-painting. Choosing the right product for your project depends on a number of factors, including odor level and VOC content, ease of application, and color vibrancy. The type of finish you select is another factor to consider. High-quality finishes are often more expensive upfront, but they last longer than traditional paints and can add significant value to your home.
Whether you’re painting your entire kitchen cabinets or just the fronts of your drawers and cupboards, the prep work is the same. Before you start, clean the surface to be painted thoroughly with warm soapy water and a cloth. If your cabinets have been previously painted, you’ll need to use a degreaser or solvent to remove any oil or grease. Then, you can sand the surface to make sure your new coat of paint will adhere.
Once you’ve sanded, wipe down the surfaces to be painted and vacuum up any dust or debris. This will help prevent dirt and dust from getting into your wet paint. Next, you’ll need to apply a commercial oil-based primer. This undercoat is essential for long-lasting results, providing a “tooth” that helps your final coat stick to the cabinet surface.
Once your primer is dry, you’re ready to start painting! You can use a roller or brush, but remember that spraying is faster and easier for large surfaces. It’s also a good idea to use fans and keep the windows open to help the paint dry quickly.
Spraying
Cabinet spraying is a quick, economical method that produces a smooth factory-quality finish. This technique is particularly well-suited for large projects because it allows you to cover more surface area with fewer coats than if you were painting the cabinets by hand. However, using a paint sprayer requires specialized gear and may be difficult to master for DIYers. If you’re unsure of your abilities, it’s best to leave the job to a professional.
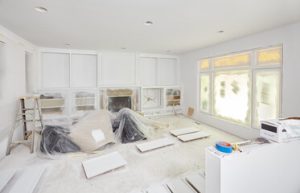
Before you start your project, you should prepare your work area. If possible, move all of your cabinets into a garage or other covered workspace that’s well-ventilated. Protect countertops and appliances with drop cloths, and mask off areas you don’t want to get paint on – including the windows, backsplash, and any exposed electrical wiring. You should also label your hardware so that you know which door or drawer each piece belongs to when it’s time to reinstall.
When you’re ready to start, test your sprayer on a piece of cardboard or similar surface before you apply it to your cabinetry. This will ensure that the product you’re using is of the right viscosity for your spray gun nozzle. You should also adjust the air pressure on the pressurized system to match your cabinet finish. Once you’ve adjusted the settings, begin by applying an even coat to each side of the cabinet with an “L” shape, starting with the backs of the cabinet doors and moving to the faces. Use a light touch and make sure to keep the sprayer moving as you work to avoid uneven coats or runs.
After you’ve applied the first coat, let it dry for at least 24 hours before applying a second. Follow the manufacturer’s recommendations regarding the number of coats necessary for full opacity and durability. Once the second coat is dry, you can reinstall the cabinet hardware and enjoy your new kitchen! If you’re refinishing your old cabinets instead of installing new ones, try using KILZ ORIGINAL aerosol primer to rust-proof metal hardware. You can also use BEHR PREMIUM Metallic spray paint to give your hardware a modern, trendy look!
Painting
Cabinet painting is a labor intensive task that requires multiple coats of paint to achieve full coverage and smooth finish. It can be time consuming, but it is also an exciting DIY project that makes a big impact in your kitchen. Unlike cabinet refacing, which is more expensive and disruptive to your daily life, cabinet painting is a cost-effective option for a quick transformation of your space.
When you’re ready to start the painting process, it is important to make sure that your workspace is clean and well-ventilated. You should place a drop cloth or newspaper on the table and set up a fan to help circulate air and avoid dust. You should also cover any surfaces that you don’t want painted, such as countertops and backsplashes, with painters tape.
Before you can apply a new coat of paint, it is important to properly sand your cabinets. This will remove the glossy layer, exposing the bare wood underneath and allowing the primer and then the paint to adhere. It is best to use a medium grit sandpaper for the job. You can also use an electric sander for larger surfaces. After sanding, you should clean the surface again with a damp cloth to remove any remaining dust. If there are any nicks or dents, they can be repaired with wood filler before proceeding to the next step.
If you’re deciding between brushing or spraying, it’s a good idea to test both methods on a small section of the cabinet. You may find that one technique works better for you than the other. It’s also a good idea to wait a few hours between each coat of paint. This allows the first coat to dry completely, which will give you a more even and smooth finish.
If you’re not comfortable with spraying, you can still get great results by hand painting. You can use a foam roller or a brush to create a smooth, even finish. When applying the first coat of paint, remember to use a light touch. Too much paint will lead to drips, which can be difficult to clean up.